|
GOPODULAR!®
Article: Arcade Joystick Theory 101
  Understanding
Happ, Sanwa, and Seimitsu Joysticks Understanding
Happ, Sanwa, and Seimitsu Joysticks
THIS ARTICLE IS UNDER CONSTRUCTION. PLEASE EMAIL ANY FEEDBACK YOU HAVE AND I'LL
EXPAND/CHANGE WHATEVER IS NEEDED.
Each of the major arcade joystick manufacturers has their own way of accomplishing the
same thing. In order to better understand the differences between them, you should
know the basic fundamentals of how a joystick works and the purpose of each part.
This article will explain the differences in joystick construction theory by pretending we
are designing our own line of joystick. Then we'll compare the behaivior of the most
common joysticks around: Happ Competition, Sanwa JLF, and Seimitsu LS-32. After
reading this, you should know the proper terminology for the various parts and be able to
help other people decide which joystick best suits their playstyle.
WARNING: None of these graphics are 100% accurate or to
scale. They are used to explain the theories behind joystick design and should be
referred to only for discussing theory.
Basic parts:
The best place to start is with a basic diagram of how a joystick is assembled.
 |
|
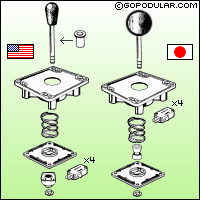
This diagram shows the basic design differences between American and
Japanese style joysticks. Note the location of the microswitches and where the
restrictor gate is placed. Since we're going to start with joystick theory, we can use
these theoretical diagrams. They are actually a hybrid of several different
joysticks, but these parts are common to most joysticks. The basic parts affecting
how the joystick feels are the: handle, shaft sleeve, base, spring, restrictor (or
"gate"), the actuator, the position of the C-clip, and the microswitches used. |
Number of "Ways":
Now we know what a joystick looks like, so let's get into some common terms. The
"number of ways" of a joystick is what people mean when they say: "I have
an 8-way joystick". It's the number of distinct possible directions the
joystick can report. Common joysticks are: 2-way, 4-way, 8-way, and 49-way. If
we think about the possible positions of a joystick, we can create a map.
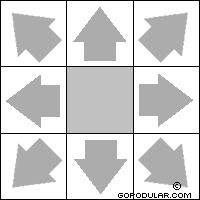 |
|
This shows eight distinct directions plus a neutral area called the
"dead-zone". The dead zone is where no input is detected because no
direction is chosen. You could also map of any of the other joysticks. A 2-way
map is divided into only three columns: left, dead-zone, and right. A 4-way map
looks like a bix "X" plus the dead-zone, and a 49-way map is divided into seven
columns, seven 7 rows, plus a dead-zone square in the center. Let's concentrate on
designing an 8-way joystick and see what options turn up. |
Restrictor Plates aka "Gates":
We need to physically contain the movements of the joystick shaft. To do this, we
create a restrictor plate. A lot of people will refer to these as a
"gate". The shape of the gate is what we'll feel as we rotate the shaft in
a circle. If we temporarily mount four microswitches, we'll be able to see how the
effect of the gate shape will influence the overall feel of the joystick.
 |
|
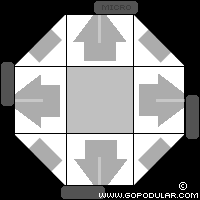
A square gate is really common. If we superimpose the restrictor on
the 8-way direction map, it doesn't look like it really does much to influence the
map. It doesn't, that's why this design is so popular. Compare the area of the
map that reports "up" to the area of the map that reports "up-right".
They are about the same area, so as you're thrashing the stick around you have an
equal chance of reporting a diagonal as reporting a cardinal direction (up, down, left or
right). If you run the shaft around the limit of the gate though, it will move in a
square shape. Not everyone likes that. |
|
|
|
 |
|
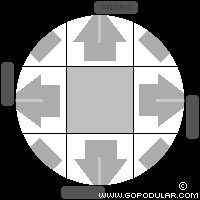
Enter the octagon gate. Sanwa joysticks are known for offering this
gate. The advantage comes when you are moving the shaft around the mechanical limit
of the gate. Instead of forming a square, it's an octagon and makes circular
movements easier. The problem that pops up when you're thrashing the stick around is
trying to hit the diagonals. If you compare the area of the map that reports
diagonals to the area that reports the cardinal directions, you'll notice it's harder to
hit the corners. You'll need to be more precise with your movements. |
|
|
|
 |
|
What about a circular gate? Well, circular movements will obviously
be easier to do, because you can run around the limit of the gate and never hit a corner.
However, you'll never feel a corner either. So which one should we
choose? That depends 100% on personal preference. Do you want easy corners,
or a smooth flow when doing circular moves? Let's say we want smooth movements and
choose the circular gate. |
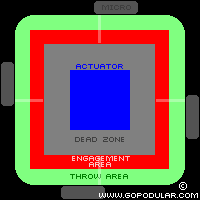
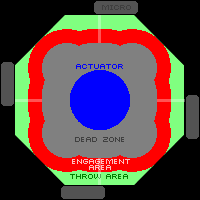
Actuators:
We need an actuator to move around and make contact with the microswitches.
Here's another choice for our design. What shape should the actuator be? There
are two basic choices: square or round. The size of the actuator will determine how
large our dead-zone is and the location of our "engagement area". The
shape will influence the engagement area and determine the "throw area"
available. The engagement area is the point where the microswitch is activated and
suddenly reports a direction. The throw area is the sloppy area where the joystick
can be moved but continues to report a direction. Joystick movement is only
detected if you're in the engagement area or the throw area. What direction the
joystick actually reports depends on where you are in the direction map.
 |
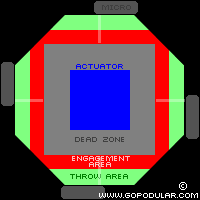
|
A square actuator combined with a square gate keeps a neutral design in
the joystick. Like the square gate, it isn't affecting anything because it maintains
an equal throw area for all the directions. In theory, this is the simplest
design. The dead-zone and engagement area are both square and the actuator is making
contact with the switched at a 90° angle. To pull off a circular movement you'll
need to move the shaft in a boxy pattern or you'll move out of the engagement/throw areas. |
|
|
|
 |
|
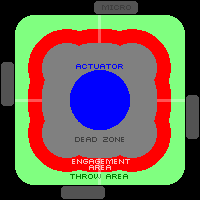
Interesting things start to happen when you use a round actuator.
Instead of a circle for the dead zone and a circular ring for the engagement area, the
shape becomes slightly deformed. The actuator starts to slip between the
microswitches and stretches those areas towards the corners. The smaller the
actuator, the larger this effect becomes. If you move the shaft in a circle along
the gate you'll feel a square, BUT... if you keep the shaft away from the limit of the
gate, you can take advantage of the near-circular engagement area. |
|
|
|
 |
|
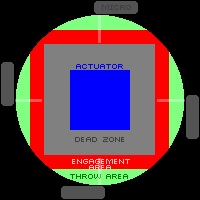
Square actuator and a round gate. Predictable dead zone, |
|
|
|
 |
|
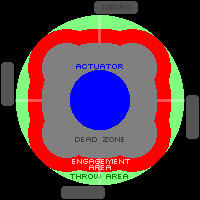
Round actuator and a round gate. |
|
|
|
 |
|
ddddddddddd |
|
|
|
 |
|
dddddddd |
So far it all seems fairly straight-forward. There's a curve ball we should
address here though. We've basically been using Happ design parameters. We've
used the gate to restrict the shaft and mounted the microswitches below the gate. If
we look at a Sanwa or Seimitsu joystick, we'd notice they both use the gate to restrict
the actuator and mount the microswitches above the gate. What does
this do to our charts? Not much. The overall theory is the same.
It does eliminate some of the combinations though. You can't bounce a square
actuator around inside a round gate very well because the actuator would twist around and
hit the switches at all kind of angles. The other thing to note is running a plastic
actuator around inside a plastic gate can lead to some wear issues. If you scour the
net, you'll find a few people mentioning they have found a plastic dust inside their
joystick. They are wearing down the plastic from their gates and actuators.
The advantages to gating the actuator are a shallower mounting depth and gates that can be
swapped easier. Since the theory is the same, we'll continue to use the Happ design.
Microswitches:
Microswitches are often overlooked in joystick design. They shouldn't be.
There are several types and manufacturers of switches. We'll discuss a couple
different types.
If you looked at an original PacMan joystick, you'd see they don't even use a
microswitch. They use what's called a leaf switch. It's a pair of long metal
blades that get pushed together when you move the joystick. They are 100% silent,
and can be adjusted for sensitivity by bending the blades closer together or further
apart. Over a period of time, you will need to readjust these switches because
constant abuse will slowly bend the leafs and affect the gameplay. Arcade route
operators used to spend a LOT of time messing around with these. Imagine having 50
arcade machines, each with four leaf switches on each joystick and a leaf switch on every
button. That's a lot of adjusting.
Microswitches are the answer to that. They are a reliable solution that don't
require adjustments. The drawback is the clicking sound they have. So how
exactly does a microswitch work? Let's take a look at a Cherry brand microswitch.
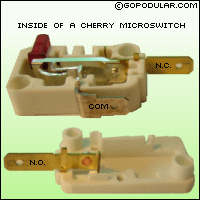 |
|
The idea is simple. Press the red button and the circuit changes
from one state to another state. The switch acts just like a train track switch.
It can take the electric current from one path and change it to another path.
"N.C." means normally closed. That's the path electricity will take
when the switch is in the "normal" position (up). "N.O." means
normally open. Since it's "open", electricity can't flow there. It's
like a dead end. "COM" is the common/shared/ground path. |
|
|
|
 |
|
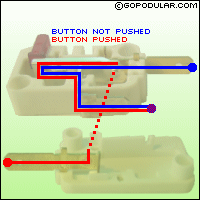
Color coded circuitry. The blue represents the flow of current when
the button is up, the red is the flow when it's down. When we push the button, we
take the circuit out of it's normal state. Basically, we have opened the blue
curcuit and closed the red circuit. |
|
|
|
 |
|
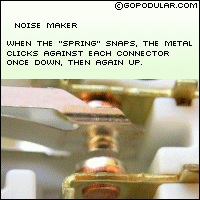
What about the mechanics? The microswitch needs a way to stay in
its normal state but also react quickly when we want it to switch. If you've ever
played with a wood saw, you'll know exactly how this works. Metal likes to keep it's
shape. If you bend it, it will spring back. That's the same principle used
here. When you push the button, the metal tab seen here gets bent. Take your
finger off the switch and it will extend. |
|
|
|
 |
|
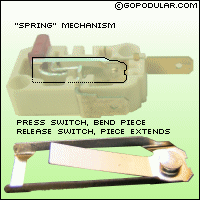
Look closely and you can see the difference in the curvature of the metal
tab. You should be able to figure out which slide represents the normal state and
which slide represents the button being pressed. The spring-like properties snap the
contact piece from one side to the other. That's what controls which path the
current can take. |
Springs:
Wwwwwwwwwww
Handles:
Wwwwwwwwwwww
Real Life Results:
Wwwwwwwwwwwwww
Conclusion:
Ywwwwwwww
|
 |